Magoshare Data Recovery for Mac
The best Mac data recovery software to recover deleted, formatted or lost data.
Free TrialmacOS Recovery (also known as Mac Recovery Mode) debuted with OS X 10.7 Lion in 2010. This Recovery HD module includes the most recent version of macOS that you installed on your Mac and allows you to solve difficulties with your Mac. It is a valuable feature that the vast majority of Mac users will never have to use unless one of the following conditions is met:
You must erase a Mac if you intend to sell it or pass it on to a new user. macOS Recovery will allow you to clean your Mac, erasing all of your data as well as your Apple ID. We have a comprehensive guide on how to wipe your Mac and restore it to factory settings.
It's worth noting that there's a new way to clean your Mac in Monterey, which we'll look into in that as well.
Alternatively, if you require the deletion of your disc for another reason...
You need to get data back from a Time Machine backup. More information on how to restore from Time Machine may be found here.
You're having difficulties with your internet connection.
There are currently two methods for entering Recovery Mode, and which one you use depends on the Mac you have.
You must enter Recovery using a different strategy if you have a new Mac with an Apple CPU, such as the M1 Macs introduced in November 2020 or one of the M1 Pro MacBook Pro models (many consumers are ignorant of this and ask why Command+R no longer works).

Follow these procedures if you need to enter Recovery Mode on an Intel-based Mac:
In the upper left corner of the screen, click the Apple logo. Select Restart.
Hold down the Command and R keys at the same time until an Apple logo or a spinning globe appears.
If the Mac is attempting to start macOS Recovery through the internet because it is unable to start via the built-in recovery system, you will see the spinning globe.
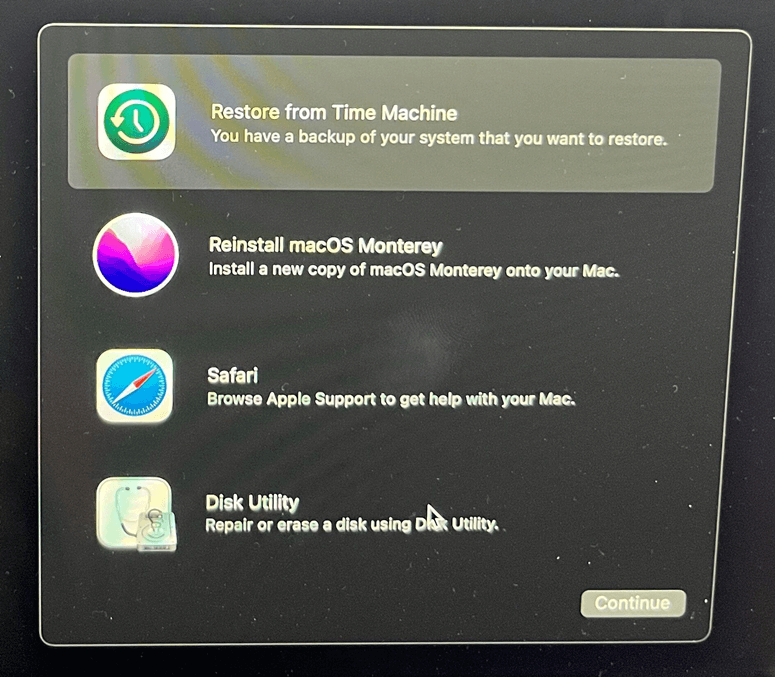
Your Mac will eventually display the Recovery Mode utility panel, which has the following options:
1 pixel = 1
Depending on what you want to accomplish, you may use a variety of key combinations to boot into Recovery mode; we'll go through these in more depth below.
There are a number of key combinations to utilize at startup depending on what you want to accomplish with macOS Recovery - these choices work on an Intel-powered Mac:
Control + R
Do this if you wish to reinstall the most recent version of macOS on your Mac (it will not install a newer version if you haven't upgraded). It's worth noting that if you're disposing or throwing free a Mac running OS X El Capitan or older, you need also use Command + R to ensure that the installation isn't linked to your Apple ID.
Command + R + Option/Alt + Option/Alt + Option/Alt + Option/A
If you wish to upgrade to the most recent version of macOS that is compatible with your Mac, use this option.
Option + Command + R Shift + Option + Command + R
This will install the version of macOS that came with your Mac, or the version that is closest to it if it isn't accessible as a download.
There are also other choices available from the top-of-the-page menu through the File, Edit, Utilities, and Window tabs.

These are some examples:
Here's how to go into Terminal in macOS Recovery:
As previously said, boot into Recovery Mode.
In the menu bar, select Utilities.
Select Terminal.
This is an important setting if you're using a T2 Mac (which includes many Intel Macs after 2018) because you'll need to be able to boot from an external disc before you can utilize a bootable installation.
Magoshare Data Recovery for Mac
The best Mac data recovery software to recover deleted, formatted or lost data.
Free TrialSecurely and permanently erase data before selling, donating or giving away Mac.
Free TrialClone startup disk, external disk, USB flash drive, memory card and more on Mac.
Free Trial