Quick Navigation:


downgrade from macOS Sequoia to Sonoma

If you've been experimenting with the macOS Sequoia beta but are finding that it's not meeting your needs, you might be considering a return to the more stable macOS Sonoma. Downgrading from a beta version of macOS can seem daunting, but with proper preparation and execution, it can be a smooth process. This guide will walk you through the steps required to uninstall macOS Sequoia beta and successfully downgrade to macOS Sonoma, ensuring you avoid data loss and system issues along the way.

Why You Might Want to Downgrade from macOS Sequoia Beta

Beta versions of operating systems are designed for testing and often come with a range of new features and improvements. However, they can also introduce bugs, stability issues, and compatibility problems with applications and peripherals. Common reasons for downgrading from a beta version include:

  • Performance Issues: Beta versions may not be as optimized as final releases, leading to slower performance or frequent crashes.
  • Incompatibility: Some applications or hardware might not work correctly with the beta software, which can disrupt your workflow.
  • Stability Concerns: If the beta version has critical issues that affect your daily use, it might be better to revert to a stable release.

Deciding whether to continue with the beta or revert to macOS Sonoma largely depends on how essential the new features are to you versus the stability and reliability of your system.

Preparing for the Downgrade

Before you proceed with uninstalling macOS Sequoia beta and downgrading to macOS Sonoma, it's crucial to prepare adequately to ensure a smooth transition and avoid any potential data loss.

Backing Up Your Data

The most important step before making significant changes to your operating system is to back up your data. Here are the main methods to back up your Mac:

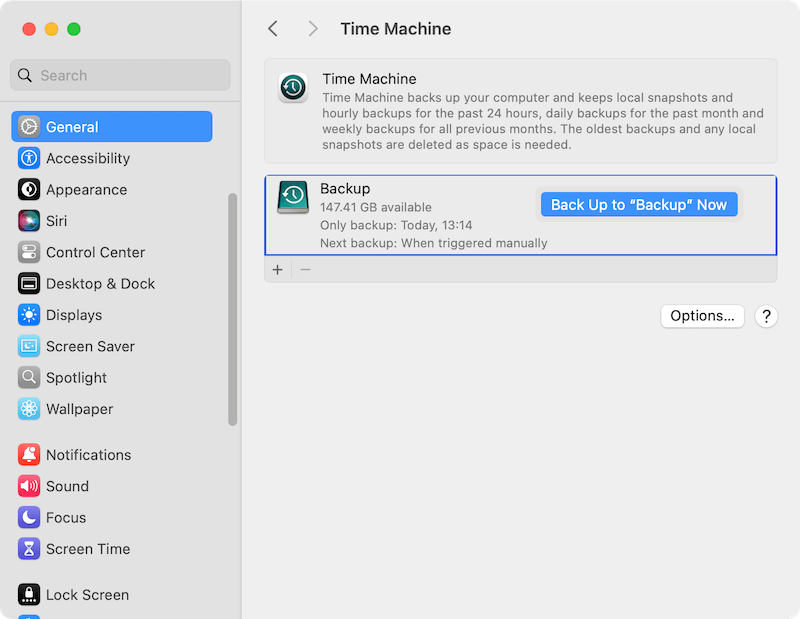
1. Time Machine: This built-in backup solution in macOS allows you to create a complete backup of your system, including all files, settings, and applications. To use Time Machine:

  • Fix an external hard drive to your Mac.
  • Go to "System Settings" > "General" > "Time Machine".
  • Choose the external drive as your backup destination.
  • Time Machine will start creating backups of your system.

downgrade from macOS Sequoia to Sonoma

2. iCloud: For those who prefer cloud backups, iCloud can store important documents and photos. Ensure that you have enough storage space in your iCloud account and that your critical files are uploaded.

3. Manual Backup: If you prefer, you can manually copy important files and folders to an external drive or cloud storage. This method is more selective but ensures that the files you care about are backed up.

Checking Compatibility with macOS Sonoma

Before downgrading, verify that macOS Sonoma is compatible with your hardware. You can check the system requirements for macOS Sonoma on Apple's official website. Ensure that your Mac meets the necessary specifications for a smooth installation.

Deactivating and Signing Out of Accounts

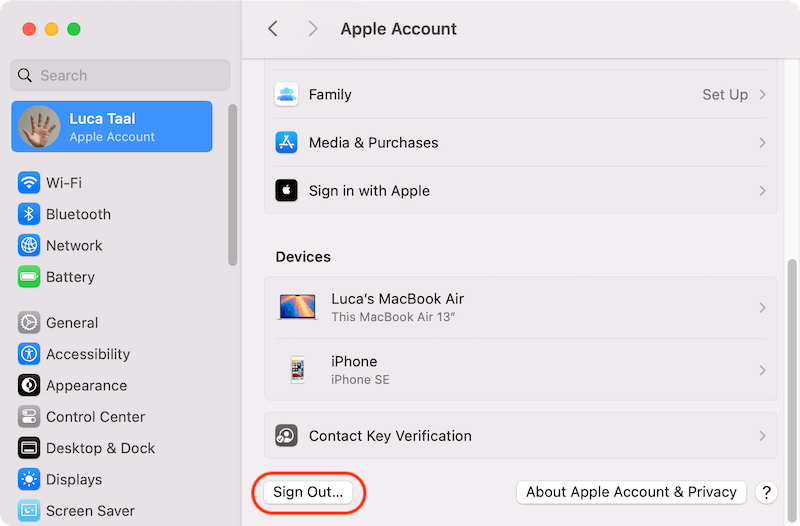
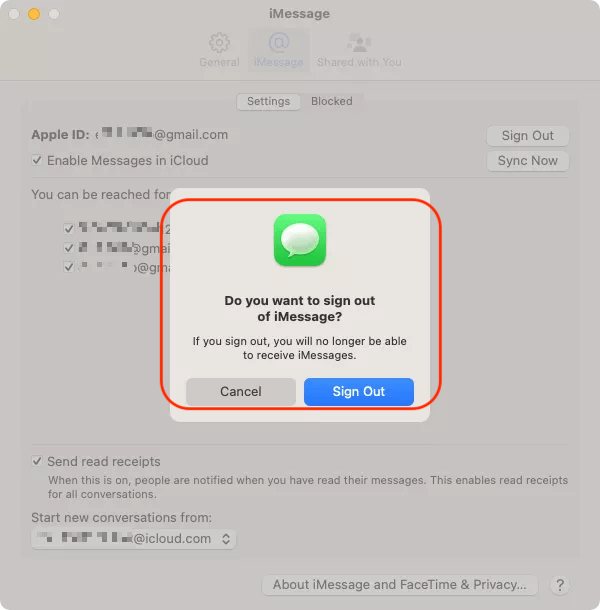
Before you uninstall macOS Sequoia beta, it's wise to deactivate and sign out of your accounts to avoid any issues with licenses or data syncing:

  • iCloud: Go to "System Settings" > the account and select "Sign Out".

    downgrade from macOS Sequoia to Sonoma

  • iMessage: Open the Messages app, go to "Messages" > "Settings", select the "iMessage" tab, and click "Sign Out".

    downgrade from macOS Sequoia to Sonoma

  • Other Accounts: Sign out of any other accounts or services that might be linked to your Mac.

Creating a Bootable macOS Sonoma Installer

To downgrade to macOS Sonoma, you'll need a bootable installer. This allows you to perform a clean installation of macOS Sonoma on your Mac. Here's how to create one:

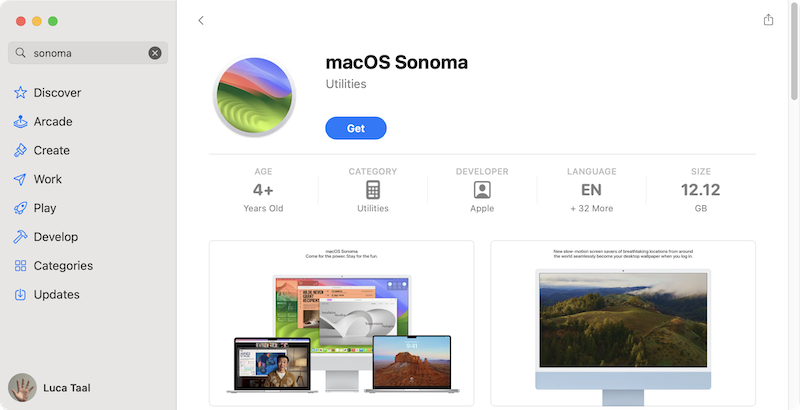
1. Download macOS Sonoma:

  • Open the App Store on your Mac.
  • Search for "macOS Sonoma" and download it. This will place the installer in your Applications folder once it's complete.

    downgrade from macOS Sequoia to Sonoma

2. Create a Bootable USB Installer:

  • Insert a USB drive (at least 16 GB) into your Mac.
  • Open Disk Utility and format the USB drive as APFS or Mac OS Extended (Journaled) with the "GUID Partition Map" scheme.
  • Open Terminal (found in "Applications" > "Utilities") and use the following command to create the bootable installer, replacing MyVolume with the name of your USB drive:

    sudo /Applications/Install\ macOS\ Sonoma.app/Contents/Resources/createinstallmedia --volume /Volumes/MyVolume

    downgrade from macOS Sequoia to Sonoma

  • Follow the prompts in Terminal to complete the process. This may take several minutes.

3. Verify the Integrity of the Bootable Installer:

  • Ensure that the USB drive has the correct installer files and is properly formatted. You can check this by reopening Terminal and using the diskutil list command to verify the drive's contents.

Uninstalling macOS Sequoia Beta

Uninstalling macOS Sequoia beta involves erasing the current installation and preparing your Mac for the installation of macOS Sonoma.

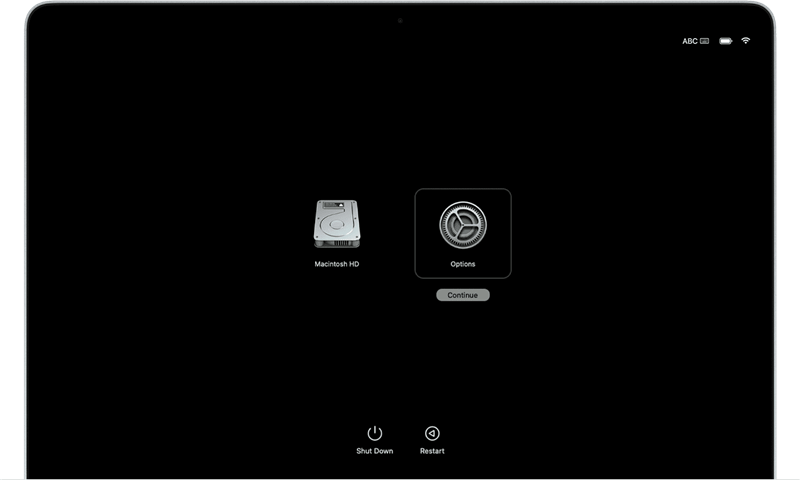
Restarting Your Mac in macOS Recovery Mode

To uninstall macOS Sequoia beta, you need to boot your Mac into Recovery Mode:

  1. Restart Your Mac: Click the Apple menu and select Restart.
  2. Enter Recovery Mode: As your Mac restarts, immediately press and hold Power button, then select Options and click Continue (or use "Command (⌘) + R" keys) to enter the Recovery Mode.

downgrade from macOS Sequoia to Sonoma

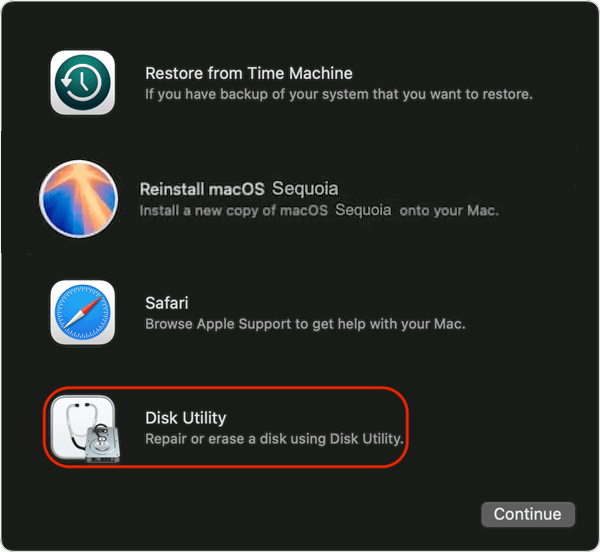
Erasing the macOS Sequoia Beta Partition Using Disk Utility

Once in Recovery Mode:

  1. Open Disk Utility: From the macOS Utilities window, select "Disk Utility" and click Continue.

    downgrade from macOS Sequoia to Sonoma

  2. Select the Drive: In Disk Utility, choose the drive where macOS Sequoia beta is installed. This is usually listed under Internal.
  3. Erase the Drive:

    Click the Erase button.

    Choose APFS or Mac OS Extended (Journaled) as the format, depending on what is compatible with macOS Sonoma.

    Enter a name for the drive and click Erase. This will delete macOS Sequoia beta and prepare the drive for the new installation.

    downgrade from macOS Sequoia to Sonoma

  4. Close Disk Utility: Once the erasure process is complete, close Disk Utility to return to the macOS Utilities window.

Confirming the System is Ready for macOS Sonoma Installation

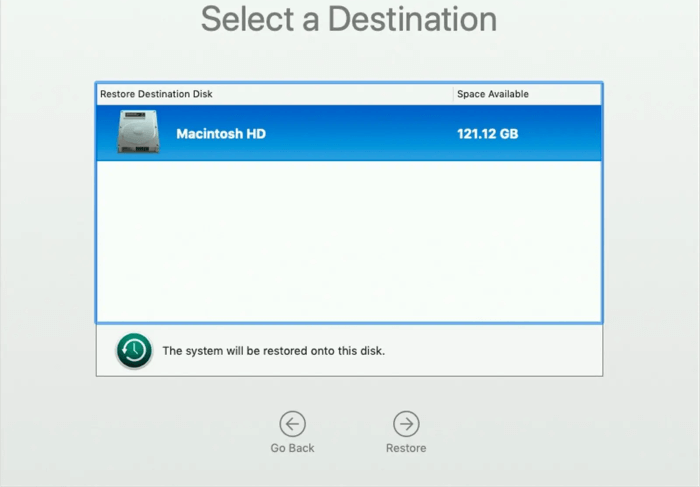
Ensure that the drive is properly formatted and appears as expected in Disk Utility. If there are multiple partitions, make sure to erase the one used by macOS Sequoia beta.

Installing macOS Sonoma

With the macOS Sonoma bootable installer ready, you can now proceed with the installation.

Step-by-Step Guide to Reinstalling macOS Sonoma

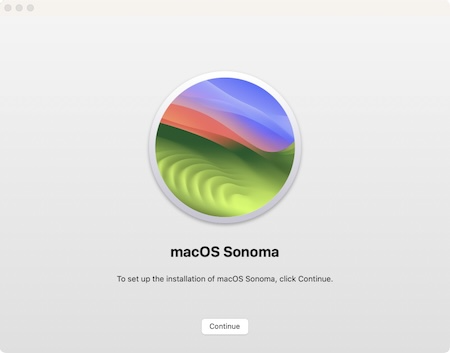
1. Booting from the macOS Sonoma Installer

  • Insert the Bootable USB Drive: Plug the USB drive with macOS Sonoma into your Mac.
  • Restart Your Mac: Restart your Mac and immediately hold down the Power (or Option ⌥ key) until the startup manager appears.
  • Select the Installer: Choose the USB drive with macOS Sonoma from the list of available startup disks.

downgrade from macOS Sequoia to Sonoma

2. Start the Installation:

  • After selecting the USB drive, your Mac will boot from it and display the macOS Utilities window. Select Install macOS and click Continue.
  • Agree to the software license agreement.
  • Choose the drive where you erased macOS Sequoia beta (usually the main internal drive).
  • Click Continue to begin the installation of macOS Sonoma.

    downgrade from macOS Sequoia to Sonoma

3. Complete the Installation:

  • The installation process will take some time and involve several restarts. Follow any additional prompts as needed.

Restoring Data and Settings

Once macOS Sonoma is installed, you can restore your data and settings from a backup.

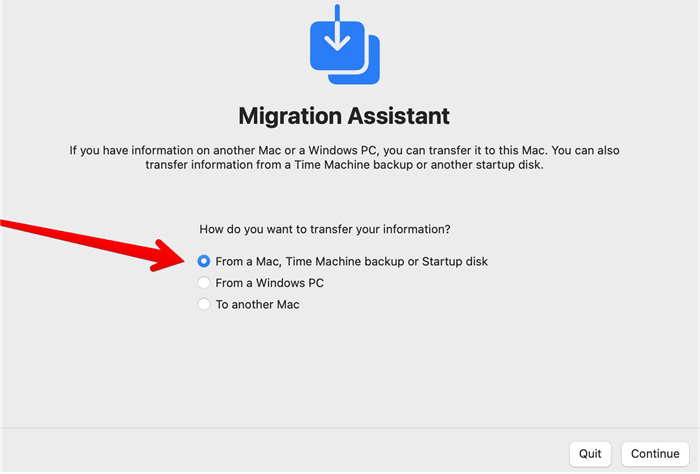
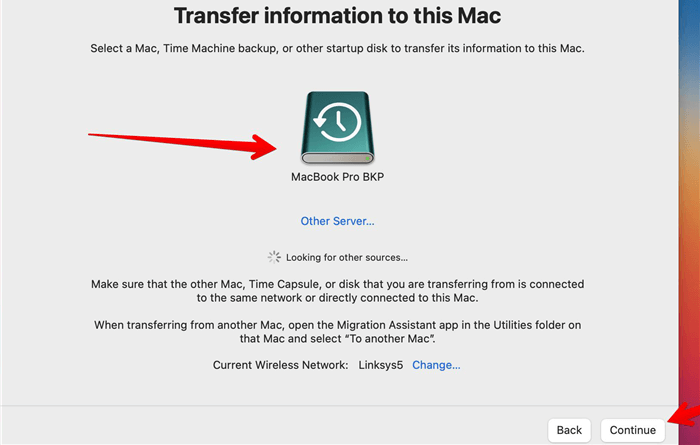
1. Using Time Machine to Restore from a Previous Backup

  • Set Up macOS Sonoma:
    • After installation, your Mac will guide you through the setup process.
    • When prompted, choose to restore from a Time Machine Backup.

    downgrade from macOS Sequoia to Sonoma

  • Select the Backup Source:
    • Connect the Time Machine backup drive if it's an external drive.
    • Follow the prompts to select the backup you want to restore.

    downgrade from macOS Sequoia to Sonoma

  • Complete the Restoration:
    • The restoration process will copy your files, settings, and applications from the backup to your Mac.

    downgrade from macOS Sequoia to Sonoma

2. Manually Restoring Files and Apps

If you did not use Time Machine, you can manually restore your files:

  • Copy Files from Backup:
    • Connect your backup drive or access your cloud storage.
    • Manually copy files and folders to your new macOS Sonoma installation.
  • Reinstall Applications:
    • Download and reinstall applications from the App Store or official websites as needed.

Reconfiguring System Settings and Preferences

You may need to reconfigure system settings and preferences that were lost during the downgrade. This includes:

  • System Settings: Adjust settings such as display resolution, sound, and desktop background.
  • Accounts: Re-add accounts like iCloud, email, and other services.

Troubleshooting Common Issues

During or after the downgrade process, you might encounter some issues. Here are common problems and their solutions:

What to Do if the macOS Sonoma Installation Fails

1. Retry the Installation:

  • Ensure that the USB installer is functioning correctly.
  • Restart your Mac and try the installation again.

2. Check Compatibility:

  • Verify that your Mac meets the system requirements for macOS Sonoma.

Fixing Problems with Restoring Backups or Missing Files

1. Verify Backup Integrity:

  • Ensure that the backup you are restoring from is complete and not corrupted.

2. Manually Recover Files:

  • If files are missing, manually copy them from your backup or cloud storage.

Addressing Any Residual Issues from the macOS Sequoia Beta

1. Reboot in Safe Mode:

  • Restart your Mac in Safe Mode by holding the Shift key during startup. This can help resolve minor issues.

2. Perform a Clean Install:

  • If persistent issues occur, you might need to perform a clean install of macOS Sonoma and manually restore your files.

Conclusion

Uninstalling macOS Sequoia beta and downgrading to macOS Sonoma is a process that requires careful preparation and execution. By following the steps outlined in this guide, you can ensure a smooth transition back to a stable operating system, protecting your data and maintaining system reliability. Whether you need to resolve performance issues or simply prefer the stability of a final release, macOS Sonoma offers a reliable and familiar environment for your computing needs.

Hot Magoshare Products

Magoshare Data Recovery for Mac

Magoshare Data Recovery for Mac

The best Mac data recovery software to recover deleted, formatted or lost data.

Free Trial
AweEraser for Mac

AweEraser for Mac

Securely and permanently erase data before selling, donating or giving away Mac.

Free Trial
AweClone for Mac

AweClone for Mac

Clone startup disk, external disk, USB flash drive, memory card and more on Mac.

Free Trial