Quick Navigation:
Creating a bootable USB installer for macOS Sequoia can be a valuable skill, especially if you need to perform a clean installation or troubleshoot system issues. This guide will walk you through the entire process, ensuring that you have a functional and reliable installer at your fingertips.
![create bootable USB installer for macOS Sequoia]()
A bootable USB installer is a crucial tool for anyone looking to install or reinstall macOS Sequoia. Having a bootable installer allows you to perform clean installations, repair your operating system, or troubleshoot issues without relying on an internet connection or preinstalled software. This article will guide you through the process of creating a bootable USB installer from scratch.
Prerequisites
Before you start creating your bootable USB installer, ensure you have the following prerequisites:
1. USB Drive Requirements
- Storage Capacity: You will need a USB drive with a minimum capacity of 16GB. While smaller drives may work, a larger capacity is recommended to ensure you have enough space for the macOS Sequoia installer.
- Drive Quality: Choose a high-quality USB drive from a reputable brand. This ensures reliability and faster performance during the installation process.
2. macOS Sequoia Installer
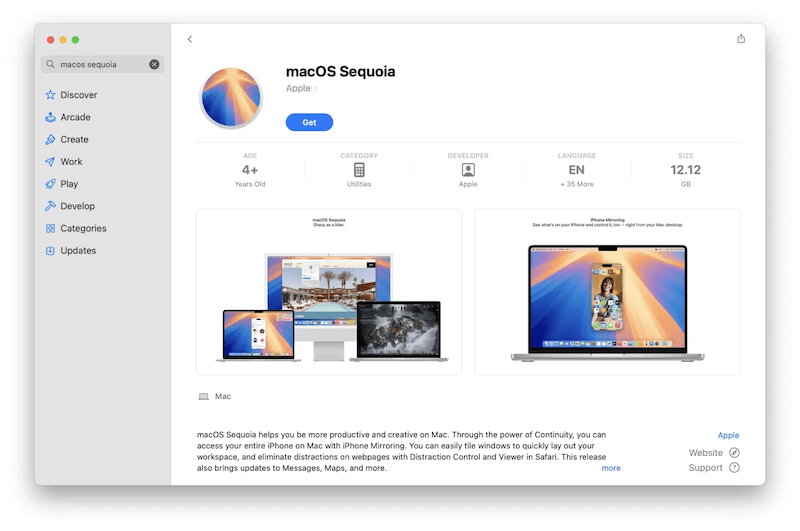
- Downloading the Installer: You must download the macOS Sequoia installer from the Mac App Store or Apple's official website. Ensure you are downloading the latest version to avoid compatibility issues.
![create bootable USB installer for macOS Sequoia]()
3. Backup Your Data
- Importance of Backups: Always back up your important data before making significant changes to your system. This precaution helps prevent data loss if something goes wrong during the installation process.
![xxxxx]()
Back up Mac data before reinstalling macOS
Clone the Mac with AweClone for Mac to back up the entire macOS along with personal settings/files.Read More >>
Preparing the USB Drive
1. Formatting the USB Drive
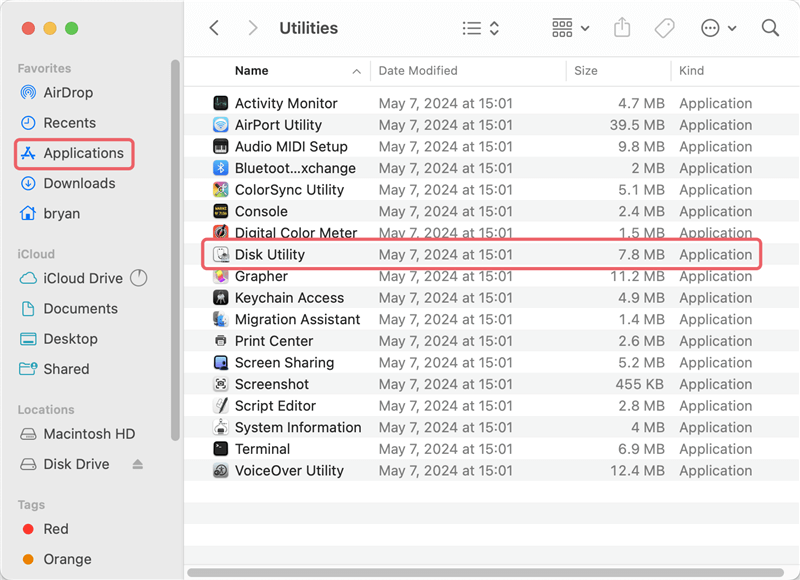
- Open Disk Utility: Begin by opening Disk Utility, which is found in the "Applications" > "Utilities" folder. Disk Utility allows you to manage and format storage devices on your Mac.
![create bootable USB installer for macOS Sequoia]()
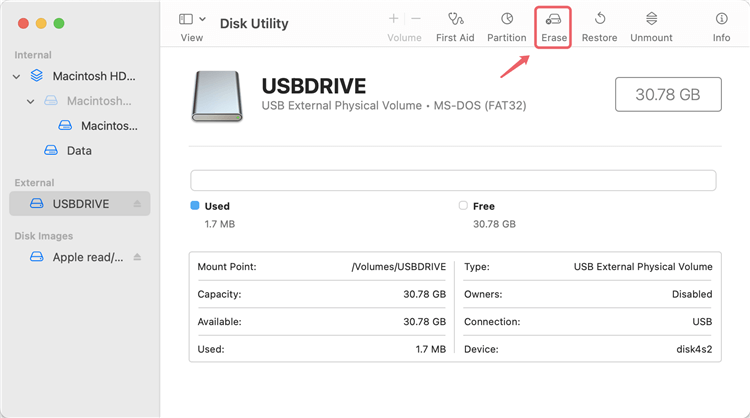
- Select the USB Drive: In Disk Utility, locate and select your USB drive from the list on the left-hand side.
- Erase and Format: Click on the "Erase" button to format the drive. Choose the following options:
![create bootable USB installer for macOS Sequoia]()
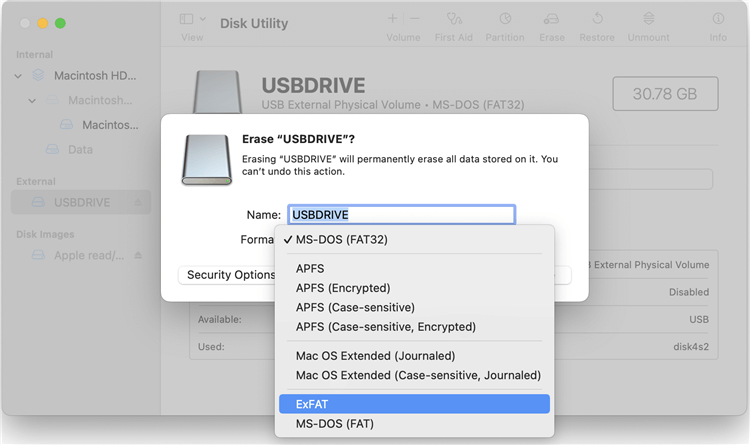
- Format: Select "Mac OS Extended (Journaled)" or "APFS" depending on your preference or the requirements of macOS Sequoia.
![create bootable USB installer for macOS Sequoia]()
- Name: Enter a name for your USB drive (e.g., "macOSSequoia").
- Erase: Confirm your choices and click "Erase" to format the drive. Ensure the drive is error-free before proceeding.
2. Ensuring Drive Integrity
- Check for Errors: After formatting, use Disk Utility to verify the drive's integrity. This step ensures that the drive is functioning correctly and is free from errors that might interfere with the installation process.
Downloading macOS Sequoia Installer
1. From the Mac App Store
- Search and Download: Open the Mac App Store and search for "macOS Sequoia." Click on the download button to obtain the installer. The download may take some time, depending on your internet speed.
- Installation Location: The installer will be placed in the Applications folder once the download is complete.
2. From Apple's Website
- Alternative Download Methods: If macOS Sequoia is not available in the Mac App Store, check Apple's official website for alternative download options. Follow the instructions provided to download the installer.
Creating the Bootable USB Installer
Using Terminal Commands
Creating a bootable USB installer using Terminal commands involves a series of precise steps to ensure that the USB drive is properly configured. Here's a more detailed breakdown of this process:
1. Open Terminal:
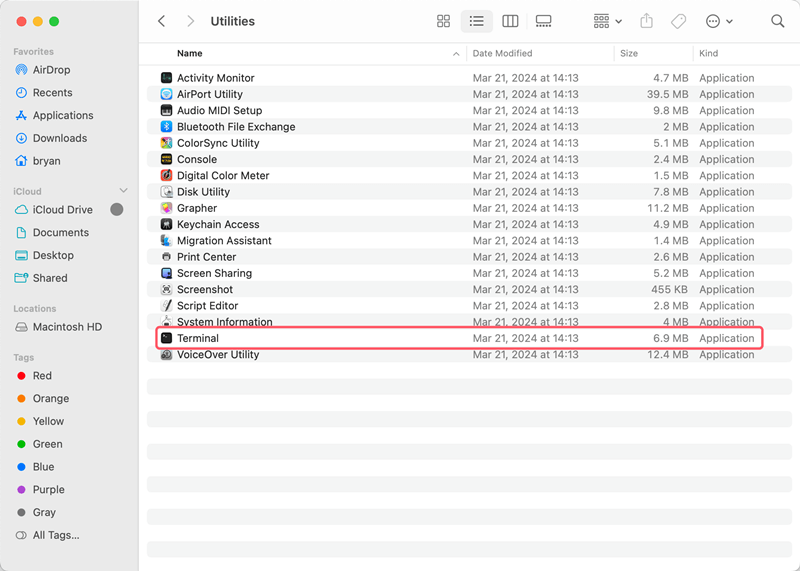
- Launch Terminal: Go to "Applications" > "Utilities" and open "Terminal". Terminal is a command-line tool that lets you interact with your Mac's operating system through text-based commands.
![create bootable USB installer for macOS Sequoia]()
2. Prepare the USB Drive:
- Ensure Proper Formatting: Before using Terminal to create the bootable installer, double-check that your USB drive is correctly formatted. It should be formatted as Mac OS Extended (Journaled) or APFS, depending on the requirements for macOS Sequoia.
- Name the USB Drive: Ensure the USB drive is named correctly (e.g., "macOSSequoia") as the Terminal command will reference this name.
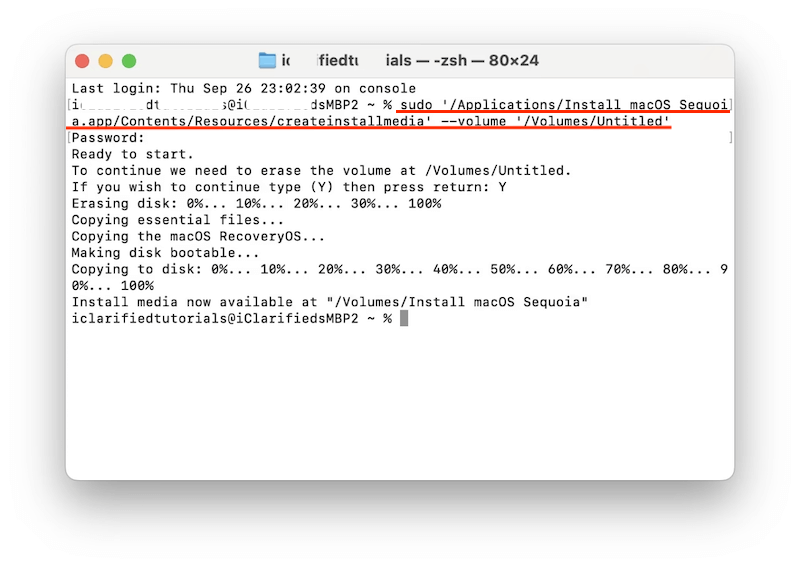
3. Enter the Command:
4. Authenticate and Execute:
- Administrator Password: After entering the command, you will be prompted to enter your administrator password. This step is necessary to grant the required permissions for creating the bootable installer.
- Wait for Completion: The process may take some time, depending on the speed of your USB drive and your Mac. During this time, Terminal will display progress messages. Avoid interrupting the process to ensure that the bootable USB installer is created correctly.
5. Verify the Installation:
- Check Terminal Output: Once the process is complete, Terminal will display a message indicating that the installation has finished. Confirm that there are no error messages, which would suggest a successful creation of the bootable installer.
Alternative Methods
While Terminal commands are a robust way to create a bootable USB installer, some users prefer graphical user interfaces for ease of use. Here's a more detailed look at using third-party applications:
1. Using Disk Creator:
- Download and Install: Obtain Disk Creator from its official website. This application provides a straightforward graphical interface for creating bootable installers. After downloading, drag the application to your Applications folder and launch it.
- Select macOS Sequoia Installer: In Disk Creator, select the macOS Sequoia installer from the drop-down menu. Ensure that you have the installer file in your Applications folder for it to appear in the list.
- Choose the USB Drive: Select your USB drive from the available options. Disk Creator will list connected drives, so choose the one you formatted earlier.
- Create Installer: Click the "Create Installer" button to start the process. Disk Creator will handle the necessary steps to copy the installer to the USB drive and make it bootable. This method is user-friendly and reduces the risk of errors.
2. Using balenaEtcher:
- Download and Install balenaEtcher: balenaEtcher is another popular tool for creating bootable USB drives. Download it from its official website and install it on your Mac.
- Launch balenaEtcher: Open the application and select the macOS Sequoia installer image file.
- Choose Target Drive: Insert your USB drive and select it as the target for the installation. balenaEtcher will handle formatting the drive and copying the installer.
- Start the Creation Process: Click "Flash!" to begin creating the bootable USB installer. The application will display progress and notify you when the process is complete.
Using third-party applications can simplify the process and provide additional features, such as easier error handling and visual feedback during the creation of the bootable USB installer.
By following these detailed steps, you can ensure that your bootable USB installer for macOS Sequoia is created accurately and efficiently, whether you use Terminal commands or a graphical application.
Testing the Bootable USB Installer
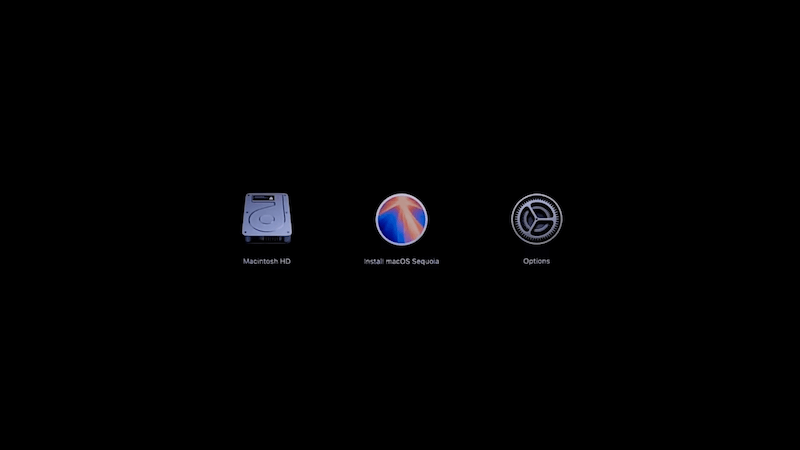
1. Restart Your Mac
- Boot from USB: To test the bootable USB installer, restart your Mac and immediately hold down the "Power" or "Option (⌥)" key. This will bring up the boot menu.
![create bootable USB installer for macOS Sequoia]()
2. Boot Menu Options
- Select USB Installer: In the boot menu, you should see your USB drive listed as a bootable option. Select it and press Enter to boot from the USB drive.
- Verify Installation: Once booted from the USB installer, check that the macOS Sequoia installation screen appears. This confirms that the USB drive is correctly set up.
Troubleshooting Common Issues
1. Installer Fails to Appear
- Possible Reasons: If the installer does not appear, ensure that the USB drive is properly formatted and that the macOS Sequoia installer was downloaded correctly.
- Solutions: Reformat the USB drive and recreate the bootable installer. Verify the integrity of the downloaded installer file.
2. USB Drive Not Recognized
- Troubleshooting: If your Mac does not recognize the USB drive, check the connections and ensure the USB drive is properly inserted. Try using a different USB port or cable.
- Drive Issues: Verify that the USB drive is correctly formatted and functioning properly.
3. Errors During Installation
- Common Errors: During installation, you might encounter error messages related to the USB drive or macOS installer.
- Resolution: Consult Apple's support resources for guidance on specific error messages. In some cases, recreating the bootable USB installer may resolve the issue.
Conclusion
Creating a bootable USB installer for macOS Sequoia is a straightforward process that can greatly assist in system installations and troubleshooting. By following the steps outlined in this guide, you can prepare a reliable installer that will help you manage your macOS Sequoia installation efficiently. Ensure you follow each step carefully and troubleshoot any issues as needed to achieve a successful setup.