Easy steps to recover deleted, formatted and lost data from local disk and external device.
Free TrialWhether you use Windows or Linux as your operating system, your computer's BIOS (Basic Input/Output System) is in charge behind the scenes.
The BIOS, also known as UEFI firmware on modern systems, tells your computer what storage disks you have and which one to boot from, as well as other important information. You may need to access the BIOS settings to modify your boot sequence, establish a system password, deactivate ports or built-in peripherals, or even overclock your computer.
On a PC, there are a number of different ways to get to the BIOS menus:
Method 1: Use a BIOS Key
The first method is to use a BIOS key.
When you turn on a computer for the first time, it goes through a fast POST process (power-on self-test). You may enter the BIOS menu by pressing the relevant hotkey before the POST is completed (or holding it down while pressing the power button). Some computers, on the other hand, move through POST so quickly that they don't register keyboard input in time for you to punch a key. If that's the case, move on to step #2 below.
Moreover, different PC brands utilize different BIOS keys, which is inconvenient. The DEL key is used on most current motherboards, however, ultrabooks, gaming laptops, and gaming PCs are less consistent. On an Asus computer, for example, using F2 may work, but on an Acer computer, you'll need to use F10.
If you don't know your computer's hotkey, watch for a message that tells you what key to press, or try tapping one of the 12 function keys, the DEL key, the Enter key, or the ESC key, since it is always one of them. It may take a few tries to figure out which one it is. DEL and F2 were by far the most prevalent in our investigation.
Manufacturer BIOS Keys
The following is a list of common BIOS keys organized by brand. The key for your model may change depending on its age.
- F2 or DEL, according to ASRock
- F2 for all PCs, F2 or DEL for Motherboards from ASUS
- F2 or DEL for Acer
- F2 or F12 for Dell
- DEL: ECS
- F2 or DEL for Gigabyte / Aorus
- F10 for HP
- F2 or Fn + F2 (Lenovo Consumer Laptops)
- F1 Lenovo (Desktops)
- Enter then F1 on Lenovo ThinkPads.
- MSI: DEL for PCs and motherboards
- Press and hold the volume up button on a Microsoft Surface tablet.
- F2 on the PC
- F2 Samsung
- F2 Toshiba
Method 2: Use the Advanced Start Menu in Windows 11 or 10.
Unfortunately, some computers rush through the POST process, leaving little opportunity to press a key. Some desktops won't even acknowledge input from a USB keyboard until the POST process is finished (though they will see input from an old PS2-style keyboard). If you don't have access to a BIOS key and are running Windows 11 or 10, you can utilize the "Advanced startup" function.
The screenshots below are for Windows 11, however, the instructions are the same for Windows 10.
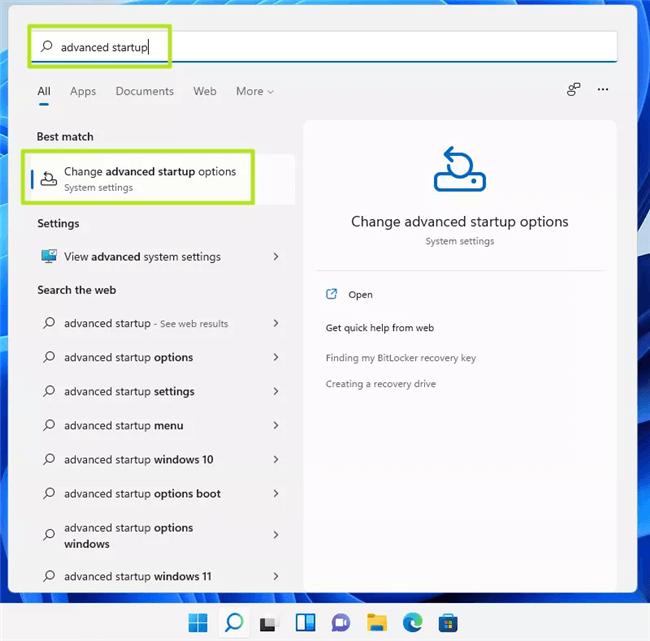
1. Open the Advanced Startup section of the Settings menu. The quickest method to get there is to use Windows search and select the first result for "advanced startup."

2. In the Advanced starting heading, click Restart now.
Restart by clicking the Restart button. Your computer will now restart, and a new menu will display.

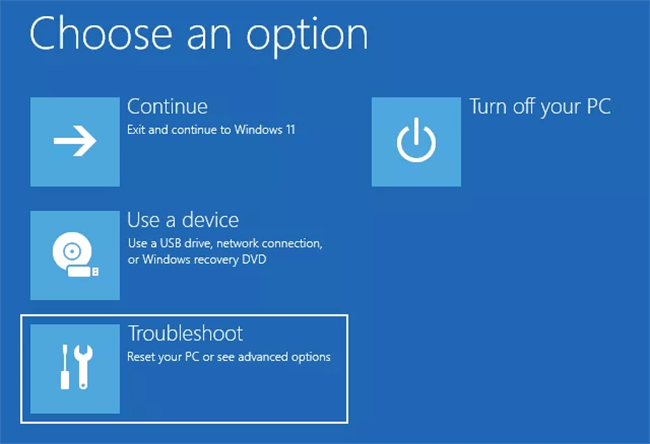
3. Select Troubleshoot from the drop-down menu.
Click the Troubleshoot button.

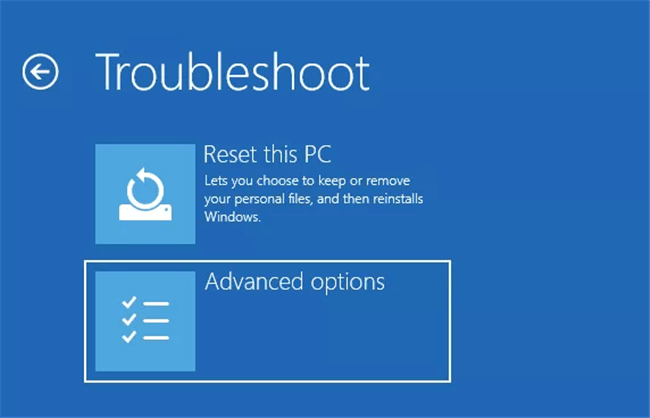
4. Select Advanced settings from the menu.

5. Select UEFI Firmware Settings from the drop-down menu.

6. To confirm, click Restart.

What if you can't get your operating system to boot or press a BIOS key?
If your computer can't load an operating system because it can't find a bootable drive, it will normally halt, beep, and prompt you to enter the BIOS, which it will commonly refer to as "setup."
The most serious issues arise when the machine POSTs too quickly for you to press a key, and then Windows or Linux attempts to boot but fails. When my bootloader was missing or corrupted, I got the Windows splash screen followed by the blue screen of death.
If you can either pick a boot device at starting or your system has configured an external USB drive as a higher boot priority than its internal storage drive, you can use an emergency boot disk to force the BIOS to appear in these instances (s).
A Windows installation disk can be used as an emergency boot drive. Instead of installing, choose "Repair your machine" and then Troubleshoot -> UEFI Firmware Settings -> Restart after the USB has booted.
Finally, if you can't start from an emergency disk, try causing a system pausing fault, which will prohibit your computer from booting from its internal disks. After that, you'll be able to access the BIOS menu.
Hot Magoshare Products
Securely and permanently erase data before selling, donating or giving away PC and digital device.
Free TrialClone boot disk, external disk, USB flash drive, memory card and more on Windows PC.
Free Trial
