Summary:
Here are three methods to help you recover deleted or lost Word documents after upgrading to macOS Monterey (or other macOS versions). It also applies to recovering lost images, PDFs, Videos, audio files, emails...on macOS Monterey.
Quick Navigation:
- Method 1. Restore lost Word documents from trash bin.
- Method 2. Restore lost Word documents from Time Machine Backup.
- Method 3. Recover lost Word documents with file recovery software.
If your computer crashes or you erase the Word file you've been working on for hours, you'll have to start from scratch. What a dreadful scenario, am I right? But Did you know that Word documents that have not been saved, lost, or deleted on a Mac may be recovered?
Even whether you're a college student, an office worker, or anybody else who uses a Mac to deal with documents, you're going to come across Microsoft Word documents daily. Word documents may be lost from a Mac in a variety of ways. A famous example is when Word crashes, you delete the incorrect one or is incorrectly terminated.
When this happens, it's natural to be alarmed and believe your data has been permanently destroyed. It's good to know that there are reliable methods for rapidly and reliably recovering Word documents.This article explains how to restore lost or deleted Microsoft Word documents on a Mac hard disk after upgrading to macOS Monterey. Because of this, there's no need to be concerned. The chances of your document being returned to you are high.
Method 1. Restore lost Word documents from trash bin.
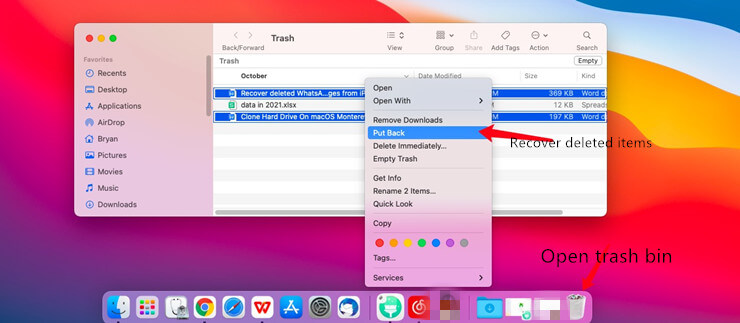
Starting with the most apparent area where files are lost, we'll look into the root cause. It's possible that you've accidentally deleted a file. When you're attempting to optimize your Mac, it's possible to accidentally delete a necessary file when you remove any unnecessary files. Fortunately, this isn't as awful as it seems. It's possible that the document is still in the trash.
Follow these steps to retrieve word documents from trash:
- Open the Trash icon on the Dock by clicking on it.
- You'll now be able to view what's in your trash. Look for your document. You may be able to get a preview of a file if you click on it and then hit the Space Bar.
- Do a search in the trash for a folder called "Recovered Items" if you don't see your file. If that's the case, your file could be there.
- If it's there, right-click on it and choose Put Back. Returning the file to its original location will allow you to work on it again.

However, you probably didn't discover your file so simple, as it would be nice if everything were that straightforward. Don't lose hope!
Method 2. Restore lost Word documents from Time Machine Backup.
Recovering deleted Word documents on a Mac may be possible with a Time Machine backup. You'll need to have a backup of your Mac created via Time Machine to use this procedure. If you haven't already, it could be a good time to get started. If you experience data loss, you can always rely on your backups.
Recovering Word files from a Time Machine backup is as simple as following these instructions:
- Connect the Time Machine backup storage device to your Mac or MacBook.
- Look for the Word file by opening a Finder window in the folder where it was previously placed.
- Click the Time Machine menu bar icon to get started with Time Machine.
- Find the Word document you wish to retrieve using the timeline and arrows in Time Machine's timeline.
- Click on the Restore option to get your files back. Your Word document will be restored to its original place in the designated folder.

Method 3. Recover lost Word documents with file recovery software.
Third-party tools that search your Mac are the best method to discover and recover a lost or unsaved word document on Mac. You may locate the missing word documents on your Mac with the help of Magoshare Data Recovery for Mac, a native support Mac application. The software is able to recover deleted/lost Word documents even you have emptied trash bin or erase Mac disk with Disk Utility.
Now, follow the steps below to recover deleted/lost Word documents on macOS Monterey or other Mac OS:
Step 1. Download and install Magoshare Data Recovery for Mac and then open it from Launchpad. The trial version can help you scan your hard drive and find all recoverable files.
Step 2. Run Magoshare Data Recovery for Mac, then choose the hard drive where you delete or lose your Word documents. If you want to recover lost Word documents on macOS 12, just select the Mac disk.

Step 3. Once you have selected the disk drive, and then click on Scan button. Magoshare Data Recovery for Mac will deeply scan the hard drive and find all recoverable files including lost Word documents.

Step 4. Once the scan is completed, you can preview all recoverable files. Select the lost Word documents and click on Recover Now button to save them.

Conclusion
All that matters is getting your document back regardless of the technique you choose to recover lost Word documents on Mac. A few easy procedures will help you recover a Word document that was deleted, encrypted by a virus, or corrupted when stored on a defective disk. However, if you have a recovery program and frequent backups, you may quickly and simply restore your documents.


