Step-by-Step Guide to Recover Data from an Unmounted USB Drive on Mac

updated on February 06, 2025 to Mac Data Recovery Solutions
Quick Navigation:
- Understanding the Problem
- Preparing for Recovery
- Using Disk Utility to Attempt a Remount
- Data Recovery Options
- Post-Recovery Actions
- Conclusion
In today's digital world, USB drives have become indispensable tools for storing and transferring data. However, one frustrating issue that many Mac users encounter is an unmounted USB drive. This situation can be particularly distressing when the drive contains important files. Fortunately, there are several methods to recover data from an unmounted USB drive on a Mac. This guide will walk you through the steps to identify the problem, attempt a remount, and recover your lost data.
Understanding the Problem
Before diving into the data recovery process, it's essential to understand what it means when a USB drive becomes unmounted. In simple terms, when a USB drive is unmounted, it is no longer accessible or recognized by your Mac's file system. This means that the data stored on the drive cannot be easily accessed, which can be a significant concern if you have important files on the drive.
Common Reasons for an Unmounted USB Drive
Several factors can cause a USB drive to become unmounted on a Mac, including:
- Corrupted File System: If the file system of the USB drive becomes corrupted, the Mac may be unable to mount it, making the data inaccessible.
- Physical Damage: Any physical damage to the USB drive, such as broken connectors or circuit board issues, can prevent it from being recognized by the Mac.
- Improper Ejection: Disconnecting the USB drive from your Mac without properly ejecting it can lead to file system corruption, resulting in the drive being unmounted.
- Compatibility Issues: A USB drive formatted in a file system that is not supported by macOS (e.g., NTFS) may not mount properly, leading to accessibility issues.
- Driver Problems: Sometimes, outdated or incompatible drivers can cause the USB drive to remain unmounted.
Consequences of Leaving the Issue Unresolved
If an unmounted USB drive issue is left unresolved, the data stored on the drive could be permanently lost. Over time, continued attempts to access the drive without resolving the underlying problem can lead to further corruption, making data recovery more challenging or even impossible. Additionally, attempting to fix the issue without proper knowledge or tools can exacerbate the problem, leading to irreversible data loss.
Preparing for Recovery
Before attempting to recover data from an unmounted USB drive, it's crucial to perform some preliminary checks and preparations. This will help ensure the process goes smoothly and reduce the risk of further damage to the drive or data loss.
Preliminary Checks
1. Check the USB Drive for Physical Damage:
Inspect the USB drive for any visible signs of damage, such as bent connectors or cracks. If the drive is physically damaged, data recovery may require professional assistance.
2. Verify the Connection:
Ensure that the USB drive is properly connected to your Mac. Try plugging it into different USB ports to rule out any issues with the port itself. You can also try connecting the drive to another Mac to see if it is recognized.
3. Use a Different USB Cable or Adapter:
If you're using an external hard drive or a USB drive that requires a cable or adapter, try using a different one to ensure the problem isn't with the connection.
Installing Necessary Software
To recover data from an unmounted USB drive, you may need to install specific software tools. These tools can help you attempt to remount the drive or recover data directly from it.
- Disk Utility: This is a built-in macOS tool that can help you manage disks and perform basic recovery operations.
- macOS Terminal: The Terminal provides command-line access to macOS's powerful utilities, which can be used to attempt data recovery.
- Third-Party Data Recovery Software: If the above tools do not work, you may need to rely on specialized data recovery software. Some popular options,like Magoshare Data Recovery for Mac.
Using Disk Utility to Attempt a Remount
Disk Utility is a built-in macOS application that allows users to manage and repair disks, including USB drives. If your USB drive is unmounted, Disk Utility is the first tool you should use to attempt a remount.
Step-by-Step Guide to Using Disk Utility
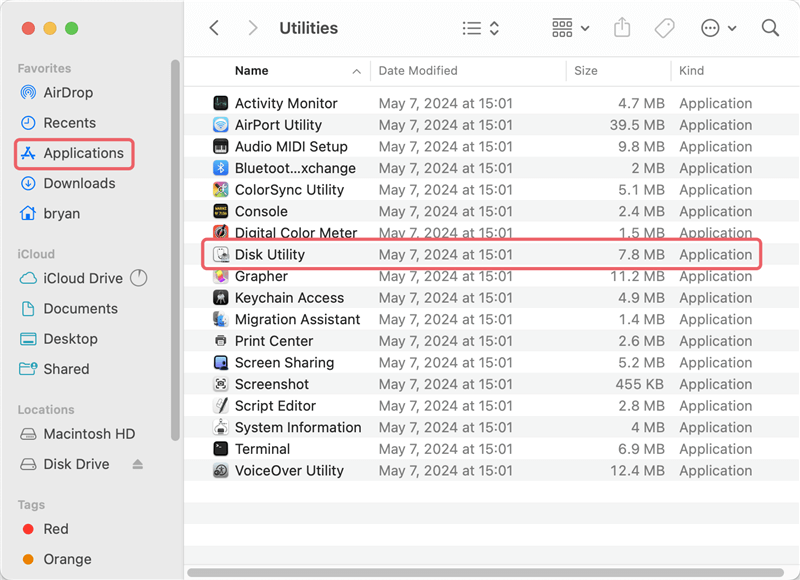
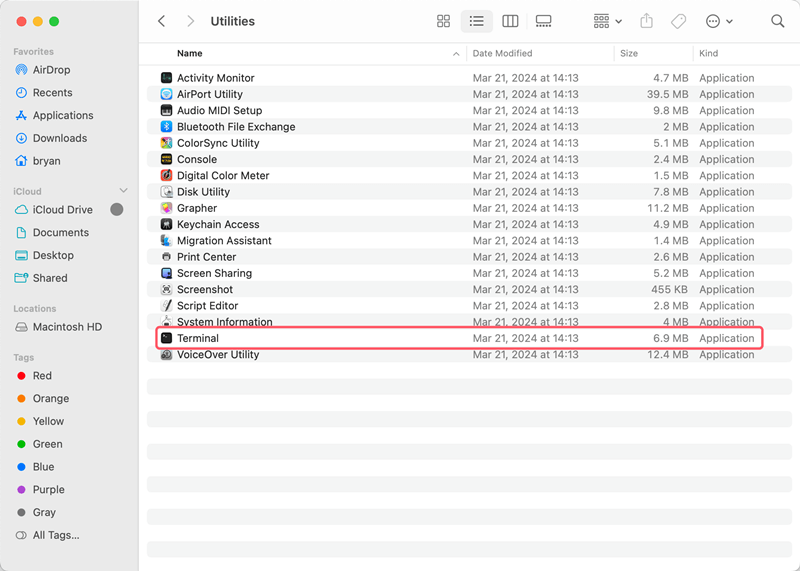
1. Open Disk Utility:
Go to Applications > Utilities > Disk Utility or simply search for "Disk Utility" using Spotlight.
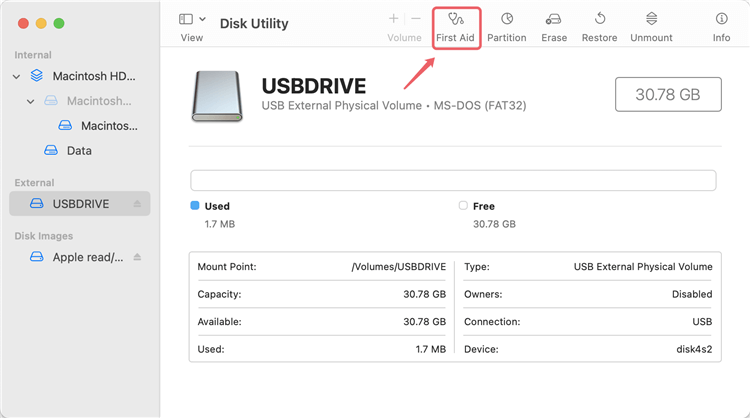
2. Select the USB Drive:
In Disk Utility, you will see a list of all connected drives on the left side of the window. Locate and select your unmounted USB drive. It may appear grayed out, indicating that it is unmounted.
3. Check the Drive's Status:
Once you've selected the drive, check its status by clicking on the First Aid button. This will allow Disk Utility to check the drive for any errors and attempt to repair them.
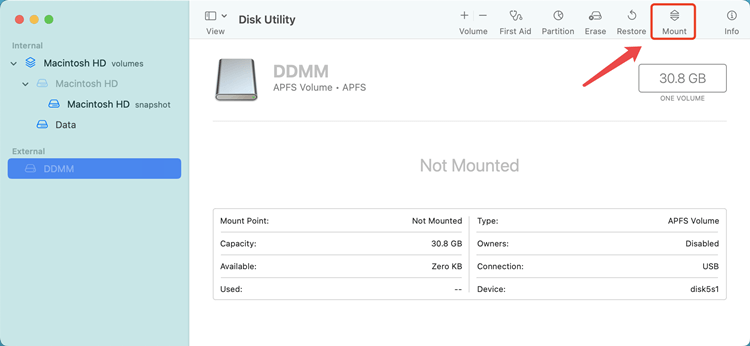
4. Attempt to Remount the Drive:
If the First Aid process is successful, you can try remounting the drive by selecting the drive and clicking on the Mount button. If the drive remounts successfully, you should now be able to access your files.
5. What to Do if the Drive Fails to Remount:
If Disk Utility is unable to remount the drive, don't panic. There are still other methods to recover your data, including using Terminal commands or third-party software.
Data Recovery Options
If Disk Utility fails to remount the USB drive, the next step is to explore other data recovery options. These methods involve using macOS Terminal or third-party software to recover data from the unmounted drive.
Option 1: Using macOS Terminal
The macOS Terminal is a powerful tool that can be used to run various commands for system management and data recovery. Here's how you can use Terminal to attempt data recovery from an unmounted USB drive.
Using diskutil Command:
1. Open Terminal: Go to "Applications" > "Utilities" > "Terminal".
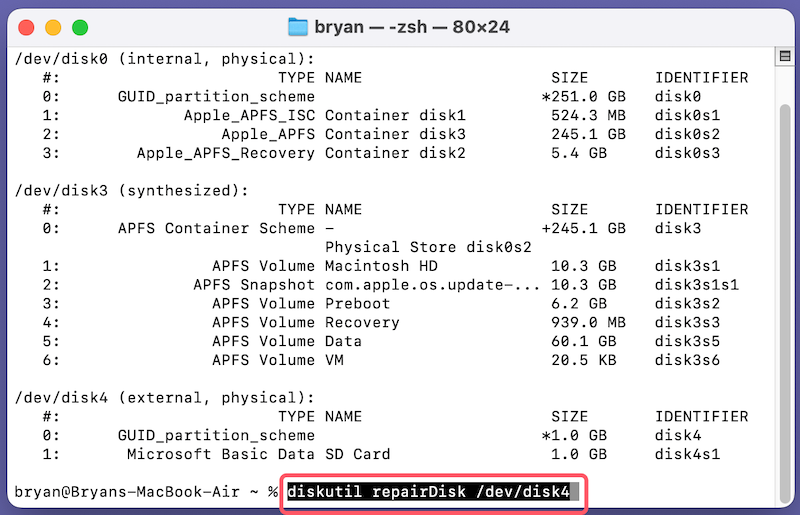
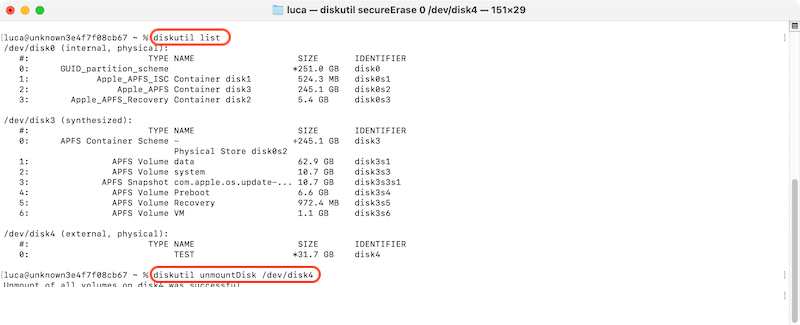
2. Identify the USB Drive: Type the command diskutil list and press Enter. This will display a list of all disks connected to your Mac. Identify your unmounted USB drive by its name and note its disk identifier (e.g., disk2).

3. Attempt to Repair the Drive: Type the command diskutil repairDisk /dev/disk2 (replace disk2 with your drive's identifier) and press Enter. This will attempt to repair any issues with the drive.
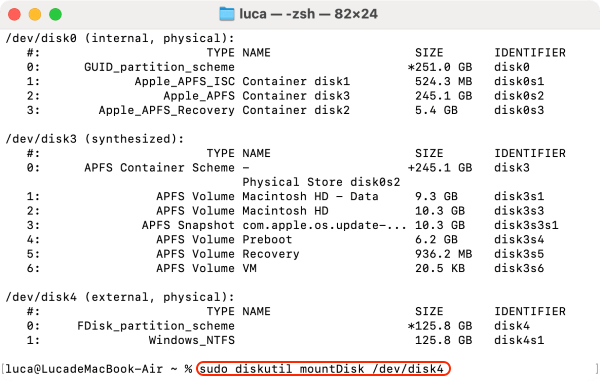
4. Attempt to Mount the Drive: If the repair is successful, type diskutil mountDisk /dev/disk2 to attempt to mount the drive. If successful, you should be able to access your data.
Using fsck Command:
1. Unmount the Drive (if it's partially mounted): If your drive is partially mounted but not accessible, unmount it first by typing sudo diskutil unmount /dev/disk2.
2. Run fsck to Repair the File System: Type sudo fsck_hfs -fy /dev/disk2 (replace disk2 with your drive's identifier) and press Enter. This command will run a file system consistency check and attempt to fix any errors.
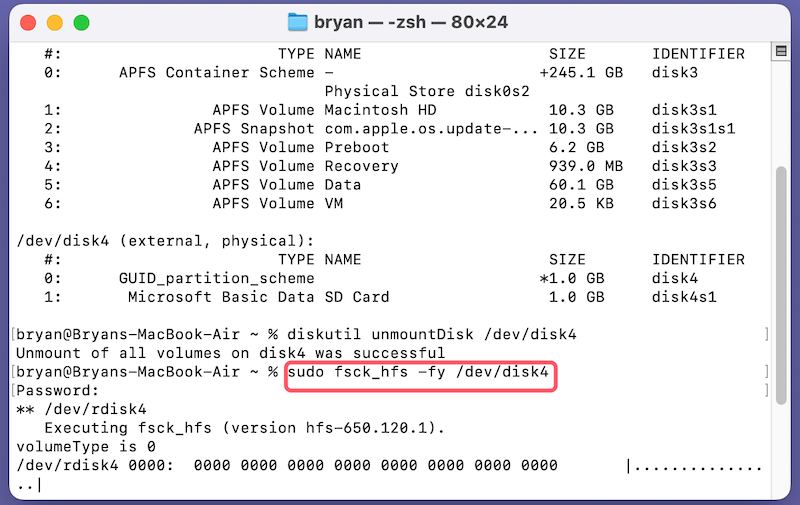
3. Remount the Drive: After the repair, attempt to remount the drive using the diskutil mountDisk /dev/disk2 command.
Option 2: Utilizing Third-Party Recovery Software
Magoshare Data Recovery for Mac: A powerful tool with an intuitive interface, offering advanced recovery options. Known for its deep scan capabilities, ideal for complex data loss scenarios, and high success rate in recovering lost files.
Magoshare Data Recovery for Mac
- Top 1 data recovery software for Mac.
- Recover deleted, format or lost files in different situations.
- 100% secure and easy-to-use data recovery tool.

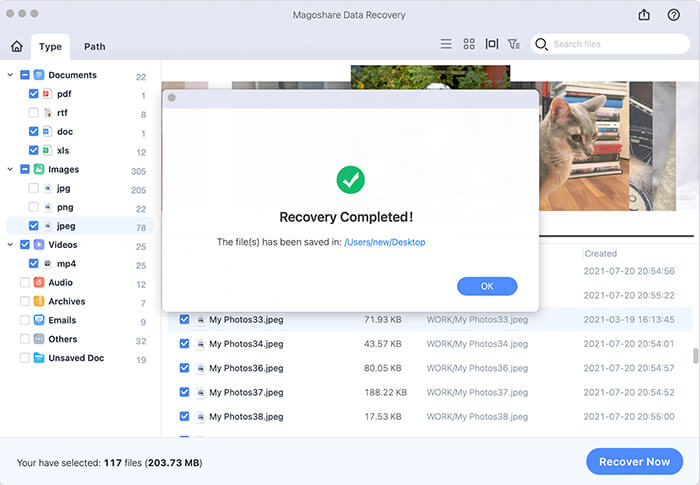
Step-by-Step Process of Using the Software to Recover Data
- Download the software and install it on your Mac. Open the software and connect the unmounted USB drive to your Mac.
- The software will display a list of connected drives. Select the unmounted USB drive.

- Initiate a deep scan to search for lost data on the USB drive by clicking on the Scan button. This process may take some time depending on the drive's size.

- Once the scan is complete, preview the files to ensure they are intact and recoverable.

- Choose the files you wish to recover and save them to a secure location on your Mac.
Option 3: Professional Data Recovery Services
When to Consider Professional Help
- The USB drive is physically damaged.
- Previous recovery attempts with software have failed.
- The data is highly sensitive or of critical importance.
How to Choose a Reliable Data Recovery Service
- Check for Certifications: Look for companies with ISO or other relevant certifications.
- Read Reviews and Testimonials: Research customer feedback to gauge the service quality.
- Ask About Data Privacy: Ensure the company follows strict data privacy and confidentiality protocols.
- Get a Quote: Obtain a detailed cost estimate before proceeding with the recovery service.
- Evaluate the Success Rate: Inquire about the company's success rate in recovering data from similar cases.
Post-Recovery Actions
Steps to Ensure the USB Drive is Working Properly
- Test the Drive: Use Disk Utility to run a diagnostic check and verify the drive's health.
- Format the Drive: If necessary, reformat the USB drive to ensure it's functioning correctly.
- Safely Eject the Drive: Always safely eject the drive before disconnecting it to prevent future issues.
How to Back Up Recovered Data Securely
- Use Time Machine: Set up Time Machine on your Mac for automatic backups.
- Cloud Storage Solutions: Consider using cloud services like iCloud, Google Drive, or Dropbox for off-site backups.
- External Backup Drives: Invest in an external hard drive for additional backup redundancy.
Preventive Measures to Avoid Future Data Loss
- Regular Backups: Schedule regular backups to ensure your data is always safe.
- Safely Eject Devices: Always eject USB drives properly to avoid corruption.
- Avoid Physical Damage: Handle your USB drives with care to prevent physical damage.
Conclusion
In conclusion, recovering data from an unmounted USB drive on a Mac can be a challenging task, but with the right approach and tools, it's entirely possible to retrieve your valuable files. Whether you opt for third-party data recovery software or seek professional help, the key is to act quickly and carefully to maximize your chances of success. Remember, regular backups are your best defense against data loss, so take preventive measures to protect your data in the future. By following these steps, you can ensure that even in the face of technical difficulties, your important data remains secure.