How to Create Bootable Clone for macOS Sonoma?

updated on 2025-02-06 to Mac Disk Clone
Page Content:
- What You Need to Prepare
- Step-by-Step Guide to Creating a Bootable Clone
- Troubleshooting Common Issues
- Best Practices for Maintaining Your Bootable Clone
- Conclusion
macOS Sonoma, the latest iteration of Apple's macOS, comes with a slew of new features and enhancements, making it a must-have for Mac users. However, with every new update, there's a possibility that something might go wrong—whether it's an installation glitch, software incompatibility, or data corruption. That's where having a bootable clone of your macOS comes into play. A perfect replica of your Mac's hard disk, complete with the operating system, programs, preferences, and folders, is called a bootable clone. This clone can be used to restore your system in the event of a catastrophic failure, or even to transfer your entire system to a new Mac.
In this guide, we'll walk you through the steps to create a bootable clone for macOS Sonoma, ensuring that you're prepared for any unexpected issues. Whether you're upgrading your current Mac, moving to a new one, or just want a safety net, this guide will help you create a reliable bootable clone.
What You Need to Prepare
Before you start creating a bootable clone, there are a few things you'll need to prepare. Having the right tools and ensuring compatibility with macOS Sonoma is crucial for a successful cloning process.
1. External Storage Device Requirements
You'll need an external storage device, such as a hard drive, SSD, or large-capacity USB flash drive, with enough space to hold the entire content of your Mac's drive. Ideally, choose a drive that is at least the same size as your Mac's internal storage. For instance, if your Mac has a 512GB SSD, opt for an external drive with at least 512GB of space. Ensure the drive is both reliable and fast, especially if you plan to use it frequently.
2. Choosing the Right Cloning Software
There are several software options available for creating a bootable clone of your macOS Sonoma. Some of the most popular include AweClone for Mac, Carbon Copy Cloner, SuperDuper!, and ChronoSync. These tools are well-known for their reliability and ease of use. When choosing cloning software, make sure it is compatible with macOS Sonoma and supports APFS (Apple File System), which is the default file system for recent macOS versions.
- AweClone for Mac: Easy-to-use disk cloning software for macOS. Compatible with the new Apple Silicon Macs and ensure to create bootable copy of the macOS Sonoma and other systems.
- Carbon Copy Cloner: This is a highly trusted tool that offers a simple interface and powerful features. It allows you to create a bootable backup with just a few clicks.
- SuperDuper!: Another reliable tool that's known for its straightforward approach to cloning. It also supports incremental backups, saving you time after the initial clone.
- ChronoSync: This is more than just cloning software; it offers synchronization, backups, and bootable clones all in one package. It's a great option if you're looking for versatility.
3. Ensuring macOS Sonoma Compatibility
Before starting the cloning process, make sure that your Mac and the external drive are compatible with macOS Sonoma. This includes checking the system requirements for Sonoma and ensuring that your Mac is running the latest version of the operating system. Additionally, confirm that the cloning software you choose has been updated to support macOS Sonoma.
Step-by-Step Guide to Creating a Bootable Clone
Now that you have everything prepared, it's time to create your bootable clone. Follow these steps carefully to ensure a successful cloning process.
Step 1: Backup Your Data
Before you start cloning your drive, it's crucial to back up your data. While the cloning process is generally safe, there's always a risk that something could go wrong. You can make sure that your data is secure and that it can be restored in the event that there are any problems with the cloning process by making a backup.
Time Machine is Apple's built-in backup solution, and it's an excellent way to create a full backup of your system. To use Time Machine, connect an external drive to your Mac, open "System Settings", then "General", and select "Time Machine". Choose your external drive as the backup disk, and let Time Machine create a backup of your system.
Step 2: Format the External Drive
Once you've backed up your data, the next step is to format the external drive that you'll be using for the bootable clone. Formatting ensures that the drive is clean and ready for the cloning process. You can format the external drive with Disk Utility directly.
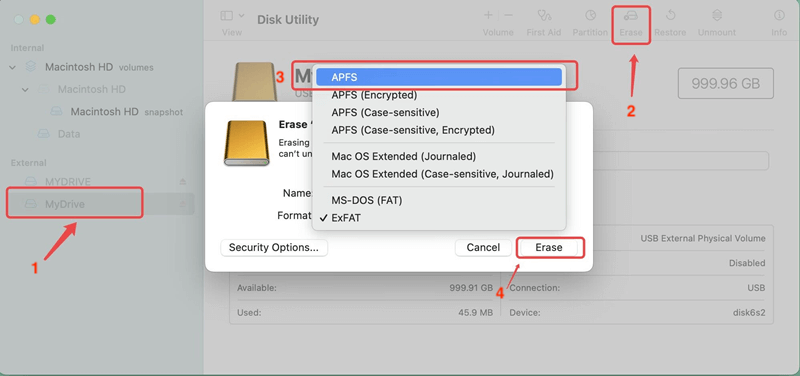
Open Disk Utility on your Mac (you can find it in the "Applications" > "Utilities" folder). Select the external drive from the list on the left-hand side, then click on the "Erase" button at the top. Choose "APFS" as the format and "GUID Partition Map" as the scheme. Give your drive a name, then click "Erase" to format the drive. This process will wipe all data from the drive, so make sure you've backed up any important files before proceeding.
Step 3: Clone Your macOS Sonoma
With your external drive formatted and ready, it's time to create the bootable clone. The exact steps will vary depending on the cloning software you choose, but the general process is similar across most tools. Here we will show you how to create a bootable clone of macOS Sonoma with AweClone for Mac.
1. Download the software and open the downloaded package, following the on-screen wizard to drag the package to "Applications" to install the software on your Mac first.
AweClone for Mac
- Easy-to-use disk cloning software for macOS.
- Guarantee the cloned drive is bootable 100%.
- Fully clone the system along with personal data, settings. etc.


2. Open the software from launchpad and choose the option "OS Clone." The system drive of macOS Sonoma will be selected as source drive by default. You can only choose the external drive as the destination.

3. Click on "Copy Now" to start the cloning process. AweClone fore Mac will create a bootable clone of your macOS Sonoma system on the external drive. The process can take some time, depending on the size of your internal drive and the speed of your external drive. Be patient and let the software do its job.

Step 4: Verify the Bootable Clone
Once the cloning process is complete, it's important to verify that the clone is bootable and functional. This ensures that your clone is ready to be used in case of an emergency.
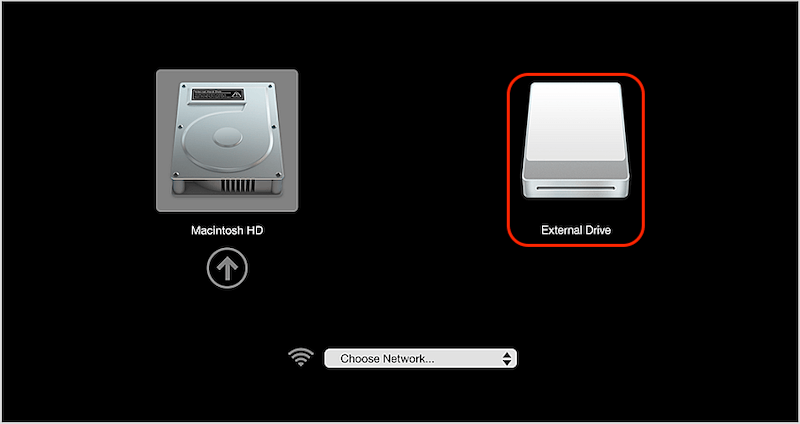
- Booting from the External Drive: To test the bootable clone, restart your Mac and hold down the Power button (or Option key for old machines) while it's booting up. This will bring up the Startup Manager, where you can select the external drive as the boot device. Choose the external drive and press Enter. Your Mac should now boot from the external drive, running the cloned version of macOS Sonoma.
- Testing the Clone: Once your Mac has booted from the external drive, take some time to test the clone. Open a few applications, check your files, and make sure everything is functioning as expected. If everything looks good, you can be confident that your bootable clone is ready for use.
Troubleshooting Common Issues
While creating a bootable clone is generally straightforward, there are some common issues you might encounter. Here's how to troubleshoot them.
1. Cloning Process Fails
If the cloning process fails, it could be due to several reasons, such as insufficient space on the external drive, a corrupted source drive, or issues with the cloning software.
- Solution: Check the available space on your external drive and ensure it's sufficient for the clone. You may need to free up space or use a larger drive. Additionally, check your source drive for errors using Disk Utility and repair any issues before attempting to clone again. If the problem persists, try using a different cloning software.
2. External Drive Not Bootable
If your external drive doesn't show up as a boot option in the Startup Manager, it may not be properly configured as a bootable drive.
- Solution: Make sure the external drive was formatted correctly as APFS with a GUID Partition Map. If you missed this step, you may need to reformat the drive and clone your macOS Sonoma again. Additionally, ensure that the cloning process completed successfully and that the cloning software was configured to create a bootable clone.
3. Cloned System Not Functioning Properly
If your Mac boots from the external drive but the system isn't functioning properly (e.g., applications won't open, settings are missing), there could be an issue with the cloning process or the external drive.
- Solution: Re-clone your macOS Sonoma system, making sure to use the correct settings in your cloning software. It's also worth checking the external drive for any errors or issues. If the problem persists, try using a different external drive or cloning software.
Best Practices for Maintaining Your Bootable Clone
Creating a bootable clone is not a one-time task; it requires regular maintenance to ensure that it remains up-to-date and functional. Here are some best practices for maintaining your bootable clone.
1. Regular Updates and Re-Cloning
As you use your Mac and install updates, your system will change. To keep your bootable clone current, it's important to update it regularly. This involves re-cloning your macOS Sonoma system to the external drive periodically, especially after major system updates or when you've installed new software.
💭 Tip: Set a schedule for updating your bootable clone, such as once a month or after every significant update. This way, your clone will always be ready to use in case of an emergency.
2. Storing the Clone Safely
Your bootable clone is a critical backup, so it's important to store it safely. Keep the external drive in a secure, dry location, away from extreme temperatures or potential damage. If possible, store it in a location separate from your Mac to protect against theft, fire, or other disasters that could affect both the computer and the backup simultaneously.
3. Using the Clone for Disaster Recovery
In the event of a major system failure, your bootable clone can be a lifesaver. If your Mac's internal drive fails or the operating system becomes corrupted, you can quickly boot from the external drive and continue working with minimal downtime. Additionally, you can use the clone to restore your Mac to its previous state or to transfer your entire system to a new Mac.
💭 Tip: Familiarize yourself with the process of booting from the external drive and restoring from the clone. This preparation will help you respond quickly and effectively in a crisis.
4. Testing the Clone Periodically
It's essential to test your bootable clone periodically to ensure it remains functional. Over time, issues could develop with the external drive or the clone itself, so regular testing will help you catch and resolve these problems before you actually need the clone.
💭 Tip: Schedule a time every few months to boot from the external drive and perform a quick check of the system's functionality. This practice will give you peace of mind, knowing that your backup is reliable.
Conclusion
Creating a bootable clone of your macOS Sonoma system is a crucial step in safeguarding your data and ensuring your Mac's reliability. Whether you're preparing for an upgrade, protecting against potential system failures, or simply looking for a way to transfer your system to a new Mac, a bootable clone provides a robust solution.
In today's digital world, where data is more valuable than ever, taking proactive steps like creating a bootable clone is a smart move. Not only does it protect your information, but it also ensures that you can quickly recover from unexpected issues, keeping your workflow uninterrupted. So, take the time to create a bootable clone for your macOS Sonoma today.