5 Methods to Undo Delete on Windows 11:
- Method 1: Using Undo Delete
- Method 2: Using Windows Backups
- Method 3: Using File History
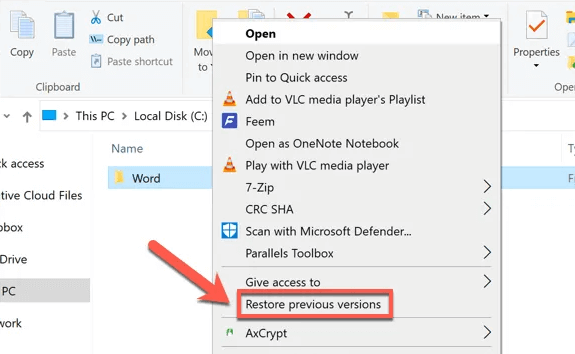
- Method 4: Using Restore Previous Versions
- Method 5: Using Data Recovery Software
Our Windows PC is common to get clogged with odd files and papers. When we remove them, we mistakenly wipe our critical data and the files necessary by several Windows applications. Many people don't know that we can recover lost data in a variety of methods rather than relying on just one or two.
Deleted data may be recovered using the Recycle Bin, a function built into Windows. As long as it doesn't have user authorization, it retains all information that the user has previously deleted. Consequently, deleted user data is often recovered using the bin feature.
In this article on how to recover lost files in Windows 11, we've included all of the available methods in an easy-to-follow way.
5 Reliable Methods to Undo Delete on Windows 11
Recovering lost data on Windows 11 may be done using the following methods:
Method 1: Using Undo Delete
Access the folder where your images were stored, then hit Ctrl + Z. You may also choose Undo Delete from the menu that displays when you right-click anywhere in the folder.

The undo tool's main problem is that all of your prior activity is wiped clean when you restart your computer. Because each action may only be performed once, Windows 11 data that have been destroyed for a long time are impossible to recover.
Method 2: Using Windows Backups
If you keep a regular backup of your data, you'll be able to access them at any time. It is possible to recover the files by following the steps mentioned below:
- The deleted folders may be restored using the System Restore feature.
- The "Backup and Restore" feature may be used by simply clicking on the Windows start button.
- On the "Control Panel," then click on the "System and Maintenance" option.
- To restore files, use the Restore my files button.

In only a few minutes, all of your erased data would be restored.
Method 3: Using File History
You may save data to a local device, an externally linked drive like a USB drive, or a networked drive using Windows' free backup program, File History. OneDrive files that are accessible offline on your PC or laptop are not included in File History backups.
Instead, only files in certain system directories like documents, music, pictures, and videos are included in File History backups. Any of these folders may be used to back up files and folders from other locations.
Over time, you'll have a full copy of your files if you activate File History. It is possible to recover essential files from backups if the original file is corrupted or destroyed.
Look for "Restore your files from File history" in the search bar and click on it.

In the File History window, you will see all of the backup files and folders that have been created. Using the left and right arrows at the bottom of the window, you may choose between several backup versions. Make sure you're using the one with the lots files.

A preview of the chosen file may be required. Click the green arrow next to the files you want to recover. To save the file to a safe location, click the gear icon in the top right corner and then choose "Restore to."

Method 4: Using Restore Previous Versions
Restore points or File History may be used to access previous versions. Therefore, you can only utilize this feature if you created a restore point or used Windows 11 File History to back up your data before accidentally deleting the files.
You may use this function to restore your computer to a previous state where the files were previously there. Using a restore point, you may recover files that have been permanently deleted. If you've accidentally deleted data, you may undo it by following the steps listed below.
Restore earlier versions of the deleted file by right-clicking on the folder and selecting Restore previous versions. Then, a recovery option will be available.

Choose a previous version from the list and then click Restore to bring up the previous version.

A restore point is required for this strategy to operate, so make one now to ensure that you can recover your data in the future.
A restore point may be created by clicking on This PC and selecting Properties, then Advanced System Settings. Then, switch on system protection, and you can build a restore point for your disk.

Method 5: Using Data Recovery Software
If the 4 methods above can’t undo delete on Windows 11, you can try data recovery software. Magoshare Data Recovery is a powerful data recovery program. It can help you quickly recover permanently deleted files on Windows 11.
Magoshare Data Recovery
- Recover permanently deleted files on Windows 11, recover recycle bin.
- Recover formatted or erased hard drive on Windows 11.
- Recover deleted or lost partition on Windows 11.
Magoshare Data Recovery supports to recover all types of deleted files on Windows 11. Just follow the steps below to undo delete on Windows 11:
Step 1. OpenMagoshare Data Recovery on your Windows 11 PC. Then select the hard drive where you delete or lose your files.

Step 2. Click on Scan button...then Magoshare Data Recovery will deeply scan the hard drive, find all deleted/lost files.

Step 3. Once the scan is completed, you can preview all recoverable files. Just select the wanted files and save them.

Conclusion
Windows 11's recovery method is almost identical to that of Windows 10. Deleted data on Windows 11 may be recovered quickly and easily using the techniques described in this article. To prevent your information from being accidentally erased again, you should set up a regular backup routine.


