How to Completely Uninstall Microsoft Office on Mac?

updated on 2025-02-08 to Mac Optimization Solutions
Quick Navigation:
- Understanding the Uninstallation Process
- Preparing for Uninstallation
- Uninstalling Microsoft Office Using Built-in Methods
- Using AweCleaner for Mac for Uninstallation
- Manually Removing Residual Files and Preferences
- Verifying Uninstallation and Troubleshooting
- Conclusion

Microsoft Office is a suite of productivity tools that are widely used in various professional and educational settings. For Mac users, Microsoft Office offers essential applications like Word, Excel, PowerPoint, and Outlook. Despite its widespread use, there may come a time when you need to completely uninstall Microsoft Office from your Mac. This could be due to upgrading to a new version, switching to an alternative software suite, or troubleshooting persistent issues that require a fresh installation. Regardless of the reason, it's important to ensure that Microsoft Office is fully uninstalled to prevent any residual files or settings from causing conflicts or taking up unnecessary space on your system.
Understanding the Uninstallation Process
Before diving into the uninstallation process, it's essential to understand the components of Microsoft Office on your Mac. The suite includes several applications such as Word, Excel, PowerPoint, Outlook, OneNote, and sometimes additional tools like OneDrive and Teams. Each of these applications installs various files and settings across your system, which need to be completely removed to ensure a clean uninstallation.
Completing the uninstallation process involves removing all application files, preferences, and associated data. Simply dragging the applications to the Trash will not suffice, as many residual files remain hidden in your system's Library folders. A thorough uninstallation is necessary to avoid any leftover files that could cause issues or take up valuable disk space.
Preparing for Uninstallation
Before you begin the uninstallation process, it's crucial to prepare adequately to ensure that you don't lose any important data or settings.
- Backing Up Important Documents and Settings: First and foremost, back up any important documents or data that you have created or stored using Microsoft Office applications. This includes documents, spreadsheets, presentations, and emails. You can copy these files to an external hard drive, a cloud storage service like OneDrive or Google Drive, or another secure location.
- Deactivating Office Licenses: If you plan to reinstall Microsoft Office later or transfer your license to another computer, it's important to deactivate your Office licenses. Open any Microsoft Office application, go to the Help menu, and select "Deactivate Office." Follow the prompts to complete the deactivation process. This ensures that you can reactivate your license without any issues when you reinstall Office.
- Ensuring Internet Connectivity: Ensure that your Mac is connected to the internet, as you may need to download the Microsoft Office removal tool or other resources to aid in the uninstallation process.
Uninstalling Microsoft Office Using Built-in Methods
macOS provides a straightforward way to uninstall applications, including Microsoft Office, through the Applications folder. Here's a step-by-step guide to uninstalling Microsoft Office applications using this method:
Step-by-Step Guide to Uninstalling Microsoft Office:
- Open the Applications Folder: Open Finder by clicking on the Finder icon in the Dock. In the Finder sidebar, click on "Applications" to open the Applications folder.
- Locate Microsoft Office Applications: In the Applications folder, locate the Microsoft Office applications you want to uninstall. These will typically include Word, Excel, PowerPoint, Outlook, OneNote, and possibly others like OneDrive or Teams.
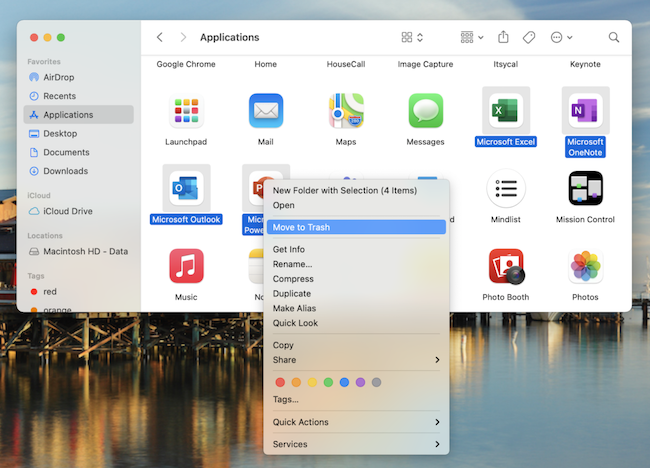
- Drag Applications to Trash: Select the Microsoft Office applications one by one, and drag them to the Trash. Alternatively, you can right-click on each application and select "Move to Trash."
![completely uninstall Microsoft Office on Mac]()
- Empty the Trash: After moving all Microsoft Office applications to the Trash, you need to empty the Trash to permanently delete them. Right-click on the Trash icon in the Dock and select "Empty Trash." Confirm the action when prompted.
While this method removes the primary application files, it does not delete all the associated files and preferences stored in various Library folders on your Mac. To ensure a complete uninstallation, you'll need to manually remove these residual files.
Using AweCleaner for Mac for Uninstallation
Magoshare provides an third-party cleanup tool AweCleaner for Mac, which can simplify the uninstallation process by automating the removal of all associated files and preferences. Using this tool can save you time and ensure a more thorough removal.
All-in-one Mac cleaner & uninstaller to optimize, clean and speed up your Mac.
Downloading and Running the AweCleaner for Mac:
- Download AweCleaner for Mac: Download the tool and install it to your Mac.
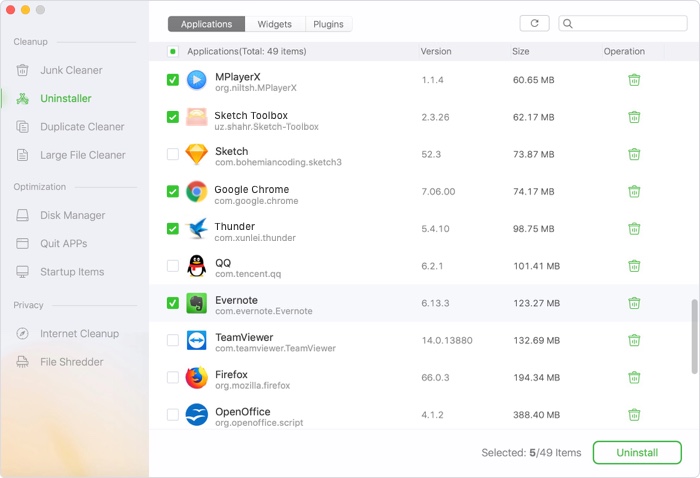
- Run the Software and Select Uninstaller: Open the tool and follow the on-screen instructions to run it. Change to "Uninstaller" option and select the Microsoft Office apps, click "Uninstall" button to remove them from your Mac. The tool will remove all Microsoft Office files. This includes applications, preferences, and other associated files.
![completely uninstall Microsoft Office on Mac]()
- Restart Your Mac: After AweCleaner for Mac completes its process, restart your Mac to ensure that all files have been properly removed and any changes take effect.
While the removal tool is effective, it's always a good idea to manually verify that all residual files have been deleted, especially if you encounter any issues during the removal process.
Manually Removing Residual Files and Preferences
To ensure a complete uninstallation, you'll need to manually remove any residual files and preferences that were not deleted during the initial uninstallation process. These files are typically stored in various Library folders on your Mac.
1. Open Finder and Navigate to Library Folders:
Open Finder and click on "Go" in the menu bar. Select "Go to Folder" and type ~/Library to open your user Library folder.2. Delete Office-Related Files:
In the Library folder, navigate to the following subfolders and delete any files or folders related to Microsoft Office:
- Application Support: Go to Application Support and look for any folders related to Microsoft Office, Microsoft, or Office. Delete these folders.
- Containers: Go to Containers and look for any folders with names starting with com.microsoft. Delete these folders.
- Group Containers: Go to Group Containers and look for any folders with names starting with UBF8T346G9. Delete these folders.
- Preferences: Go to Preferences and look for any preference files (.plist) related to Microsoft Office applications. These files usually have names starting with com.microsoft. Delete these files.
- Caches: Go to Caches and delete any caches related to Microsoft Office applications. These caches usually have names starting with com.microsoft.
- Saved Application State: Go to Saved Application State and delete any saved states related to Microsoft Office applications. These states usually have names starting with com.microsoft.
3. Check System Library:
Additionally, you may need to check the system Library folder for any remaining files. Open Finder, click on "Go" in the menu bar, select "Go to Folder," and type /Library to open the system Library folder. Repeat the above steps to delete any Office-related files.
🎈 Caution: Be cautious when deleting files from Library folders, as some files are critical to system operations. Ensure that you only delete files related to Microsoft Office. If you are unsure about a file's purpose, consider consulting online resources or seeking professional assistance.
Verifying Uninstallation and Troubleshooting
After completing the uninstallation process, it's important to verify that all Microsoft Office components have been removed from your Mac. This ensures that no residual files or settings are left behind.
Checking for Remaining Office Files: To check for any remaining Office files, you can perform a search on your Mac:
- Search Using Finder:
- Open Finder and click on the search bar in the upper right corner.
- Type Microsoft or Office and review the search results for any remaining files or folders related to Microsoft Office.
- Delete any remaining files you find.
- Check for Hidden Files:
- Some residual files may be hidden. To reveal hidden files, open Finder, press Command + Shift + . (period) and review the Library folders again for any hidden Office-related files.
Testing for Successful Removal: To ensure that Microsoft Office has been completely uninstalled, try the following:
- Attempt to Open Office Files:
- Try opening a Word document, Excel spreadsheet, or PowerPoint presentation. If Office has been completely uninstalled, these files should not open with any Office applications.
- Reinstall Office (if necessary):
- If you plan to reinstall Microsoft Office, download the installer from the official Microsoft website and follow the installation instructions. Ensure that the installation process proceeds without any issues, indicating that all previous Office components have been removed.
Troubleshooting Common Issues: If you encounter any issues during or after the uninstallation process, consider the following troubleshooting steps:
- Permissions Errors:
- If you receive permissions errors when trying to delete files, ensure that you have administrative privileges. You may need to enter your administrator password to confirm the deletion of certain files.
- System Performance Issues:
- If your Mac experiences performance issues after uninstalling Office, restart your computer to ensure that all changes take effect. Additionally, check for any remaining residual files and delete them as necessary.
Conclusion
Completely uninstalling Microsoft Office from your Mac involves more than just dragging the applications to the Trash. To ensure a thorough removal, it's essential to delete all associated files and preferences stored in various Library folders on your system. By following the steps outlined in this article, you can effectively uninstall Microsoft Office, freeing up disk space and preventing any potential conflicts with future installations.
Backing up your important data, deactivating Office licenses, and using the Microsoft Office removal tool (if available) can streamline the process. Manually removing residual files and preferences ensures that no leftover files remain, providing a clean slate for reinstalling Office or switching to alternative software. Verifying the uninstallation and troubleshooting any issues that arise help ensure a smooth and successful removal process. By maintaining good habits for software installation and removal, you can keep your Mac running efficiently and minimize the risk of residual files causing problems.
By following these steps, you can confidently and completely uninstall Microsoft Office from your Mac, ensuring a clean and clutter-free system.
All-in-one Mac cleaner & uninstaller to optimize, clean and speed up your Mac.